We joined the Amsterdam based Fiber Arts Studio for a wool workshop. The intention of the workshop was to gain deeper insight into the material of wool. We were invited to touch, feel, pull, twist, and spin the raw wool. For this workshop, textile researcher Raven Kiss had prepared seven fleeces of local Dutch sheep for us.
- White Swifter sheep adult
- White Swifter sheep lamb
- Schoonenbeeker Heideschaap
- Drents Heideschaap
- Bonte scheep
- Brown Swifter sheep adult
- Brown Swifter sheep lamb

From left to right: Black Swifter lamb, Black Swifter adult, Bonteschaap, Drents Heideschaap (most left corner of white fleece), Schoonebeeker (most right bottom corner of white fleece), Swifter lamb, and Swifter adult.
Raven found these fleeces from local farmers and hobbyists all over the country. She had already cleaned the wool (by letting them soak in a hot bath of water, olive soap and a dash of vinegar). This had removed most of the dirt, fecal matter, and strong smell, which made the wool more pleasant to work with. During the cleaning process, one of the most interesting elements of sheep wool is also removed: the lanolin. Lanolin is the oily waxy substance that you’ll feel when touching raw wool. It has quite a distinctive smell and is the element that gives wool its water-resistant properties. Little bits of lanolin always remain in the fleece, so some of the properties remain.
Our first step was to explore the wool by touching and feeling it. To no surprise, it’s instantly noticeable that the lambswool is softer than wool of an adult. By pulling and stretching the yarn, more qualities can be explored. We saw how long the fibres of the Drents Heideschaap are (18cm), while the Swifter lambs had the shortest fibre (12cm). Interesting findings. But what insight do they give us? How does the length of the fibre impact the final product? We were about to learn that in the next step: spinning the wool.
Spinning Without a Spindle
Our introduction to spinning began with us priming a small section of wool by fluffing up and separating the fibres. This gave a very basic combing to the wool and helped to break up the denser clumps. Next, we drafted the wool slightly and simply used our hand to roll the fibres over our thigh. By keeping tension on the wool and performing a continuous rolling motion, a thread formed in our hands. Albeit a very chunky thread, it was a wonderful demonstration of the essence of spinning.
We continued through the day with a mindset to embrace the imperfections.

Navigating the lumps and bumps in the wool, managing tension, and general uncoordination from trying a new craft lead to a perfectly imperfect first strand of thread.
Making a DIY Spindle
Our next exercise involved our first bit of technology: a DIY drop spindle. We added two CDs to a wooden stick (to act as the whorl) and screwed a small eyelet to the top to hold the thread.

The makeshift drop spindle is a tool to provide momentum for the twisting motion that makes the thread. A piece of string is knotted a couple of inches below the CDs that is then threaded through the eyelet at the top. The end of the string is finished with a loop where the wool can initially be folded on itself and spun.

Becky proudly holding her DIY spindle. Once a good length of thread has been created, it can be unhooked from the top and wound around the stick. To continue, the thread is hooked again and the spinning process can proceed.
Spinning with DIY spindle
By giving a good twist to the stick, the entire spindle will be set in motion. The string with the wool at the end will start to twist, and once enough tension has been built up, will make the wool fibres twist into a thread too.
You must draft wool from your batt in sections while you are threading. It’s very important to keep tension on the thread, otherwise it comes undone. The amount of wool you draft dictates the thickness of the thread.
Writing all of this makes a lot of sense to us, because we have the tactile memory of these actions. Reading this description might not be very valuable without the opportunity of testing it yourself.

A cool example of how black and white plucks of the Bonte schaap wool turned into a greyish uniform thread.
Carding the Wool
After we tried using the spindle with raw wool and gotten a good feel of it, we were invited to card the wool and discuss the impact it has on the process.
In the picture below you can see Becky card the wool of an adult black Swifter sheep with one of the hand carders available. The goal here is to align all fibres into one direction, which helps when drafting.


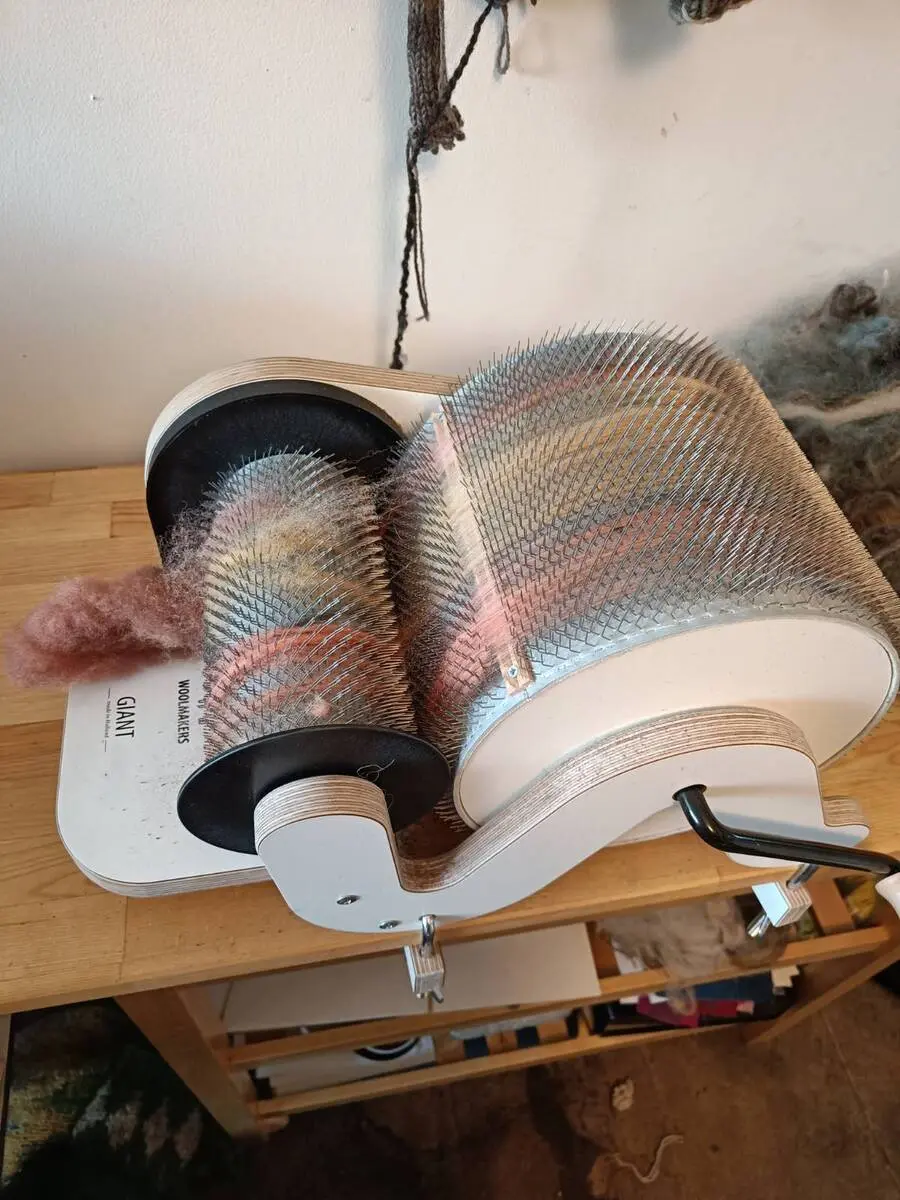
We were also able to try a drum carder at the studio. This impressive piece of technology makes the carding process slightly less laborious. You can feed larger batts of wool into the machine and control the rotations by spinning the handle. You are also able to experiment with colour blending more easily than with hand carders. Below you can see an action shot of Becky’s carding process of blending two colours together.
Below you’ll see all the samples Jaer made. The first sample is the hand spun thread, the second is thread from uncarded, and the third thread is made from carded wool. You can see the more steps are added to the process, the more uniform the thread becomes.
Troubleshooting Issues
To round up the spinning portion of this blog post, below you can see a handy table of troubleshooting issues we encountered:
| Issue | Fix |
|---|---|
| String falling out of the eyelet | Position the string coming from the back of the opening of the eyelet |
| Spinning the wrong way (anticlockwise) | Check which way the spindle naturally wants to turn and spin the opposite way (once spinning had begun). Otherwise, take a moment at the beginning of your first spin to start clockwise. |
| String snapping | Be mindful to not put the string under too much tension |
| CDs moving | Position the rubber bands more closely to the CDs |
| String coming undone | Double or triple tye knots to ensure the string is secure |
Reflections on Dutch Wool Samples
After making sample threads with all the different wools, here are our findings: The lamb wool generally has softer fibres, but they are shorter. The shorter fibres make the wool a bit more difficult to spin. The adult wool feels a tad more coarse, but it comes with the advantage of being easier to spin because of the longer fibres. In particular, the Drents Heideschaap had long, coarse, and relatively thick wool. This sheep is one of the oldest breeds, finding its origin in the Netherlands around 4000BC.

Reflections on Colour
Looking at the sample threads we made, it’s interesting to note that most threads seem to have a relatively homogeneous colour. The whites obviously remain white, and the blacks remain black. The adult black Swifter however had a lot of grey hairs in it, but because they were distributed evenly over the fleece, it still resulted in a homogenous thread. The wool of the Bonteschaap is very patchy, which results in a very patchy thread.

Bonteschaap with its patchy fleece (and wonderfully spotty legs!).
Natural Dyes
In the second half of the workshop, Raven taught us about the process of dyeing wool. White fleeces make an obvious choice for the most dramatic colour change because they are essentially a blank canvas. Darker fleeces can still accept dye, however, your only option is to deepen the original colour. We didn’t get to try the dying ourselves, but we were taught all we needed to know to get started.
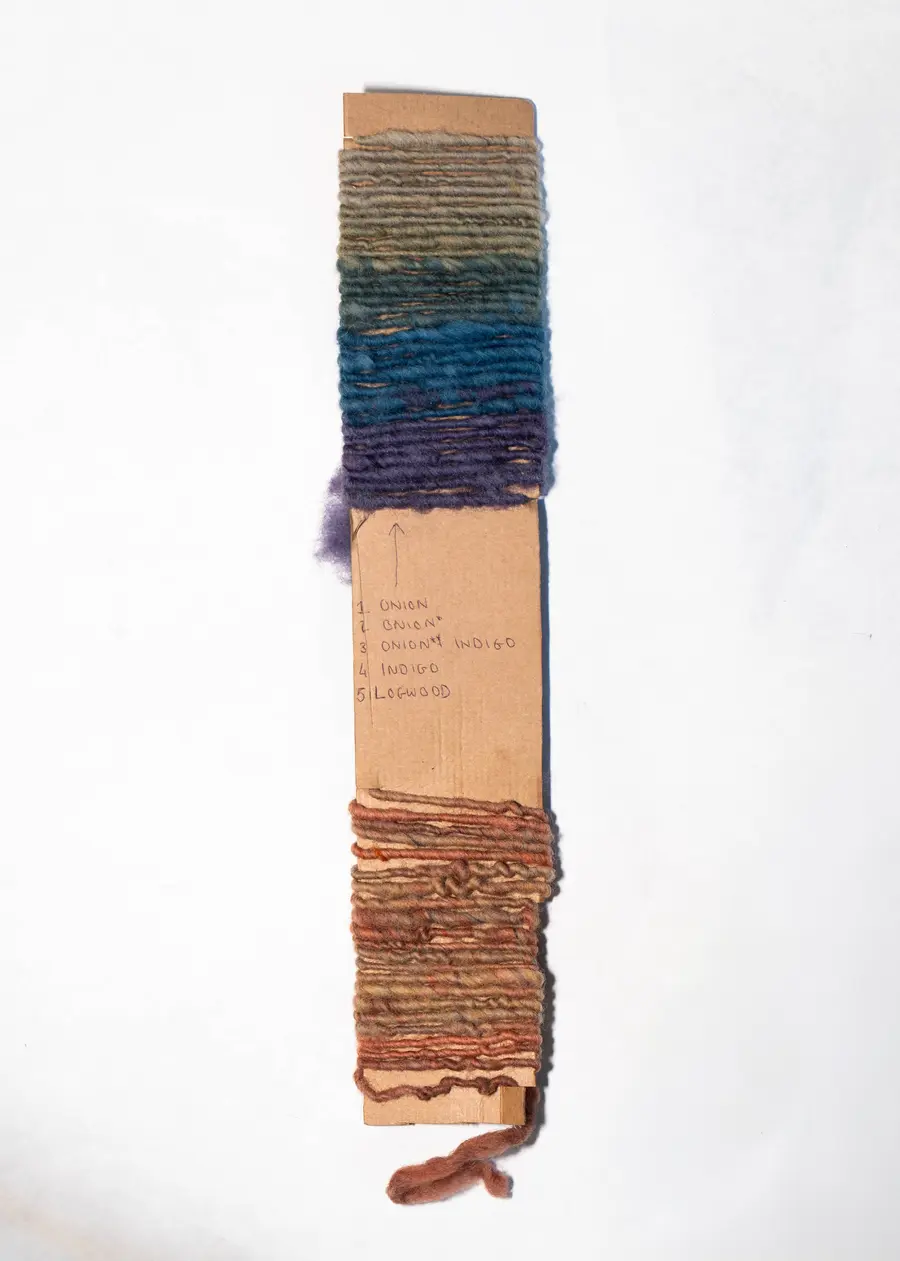
 Becky's sample of various naturally dyed wool
We touched upon natural dyes and methods for stead fasting colour. The primary colours can be achieved through three main plants; Weld (Reseda Luteola) for yellow, Indigo (Indigofera Tinctoria) for blue, and Madder (Rubia Tinctorum) roots for red. Tannin rich material such as onion skins create long lasting browns and pinks. Cochineal insects can be crushed to produce a bright red, however, obviously uses an animal product to produce. Interestingly, beetroot and red cabbage, while creating bright colours initially are prone to fading over time. Purples can be achieved through logwood, which is largely grown in South America. While greens are the most prevalent colour in nature, it’s actually one of the hardest colours to achieve naturally. This is due to the difficulty in capturing chlorophyl which is the compound responsible for the green colour. Nettle can achieve a green dye, however, it’s unstable and prone to fading.
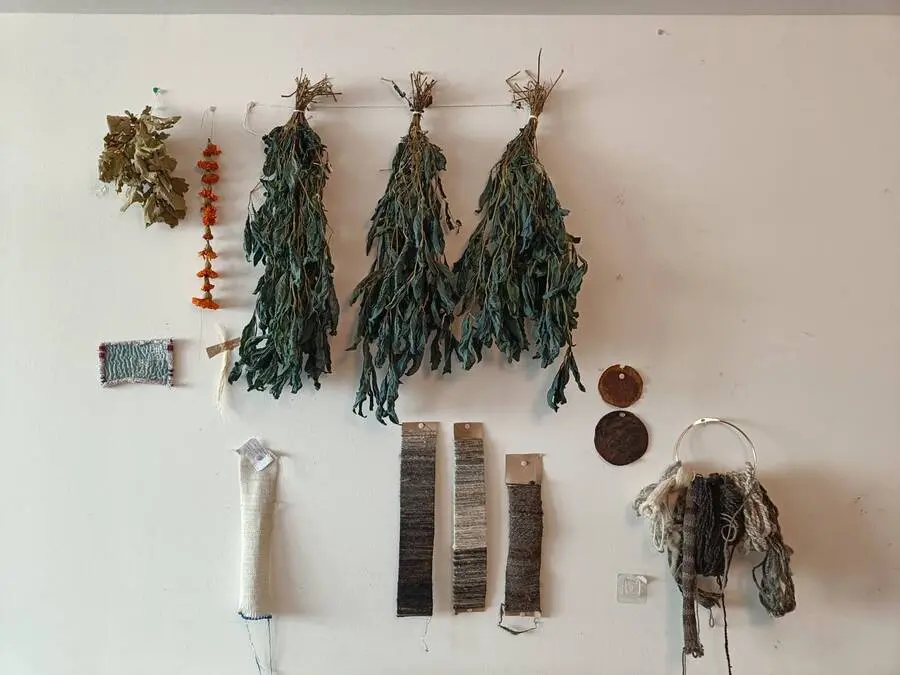
Three bundles of Indigo hang in the studio which have been dried, ready to be fermented.

A wonderful collection of natural materials for dying. Madder root has been found in the Netherlands since the 15th century, especially from Zeeland and the South Holland Islands due to the high levels of clay in the ground.

Natural dyes require mordants to set the colour and keep it prone to fading. This is always the first step when preparing fabrics to accept colour. The word mordant comes from the French ‘mordre’ meaning ‘to bite’. The two metal salt mordants that we were introduced to were alum and iron salt. Some mosses contain alum, however, there is a note about sustainability here as they are slow growing, so stores are quick to use and slow to replenish. Tannins are a plant based mordant, occurring naturally in plants and seeds such as oak leaves and their acorns.
But the most important lesson here Raven imparted to us was to just try it out. Experiment, learn by doing, document your learnings (in case you want to remake a particular colour recipe), and make samples.
That was also our big take away from this workshop. To understand material, you need to touch it, you need to test it, you need to work with it. The academic information doesn’t mean anything without the tactile knowledge.


End result after a full day of spinning and learning. Samples by all seven participants of the workshop.
 Becky's coloured samples.
 Becky's natural samples
 Jaer's samples